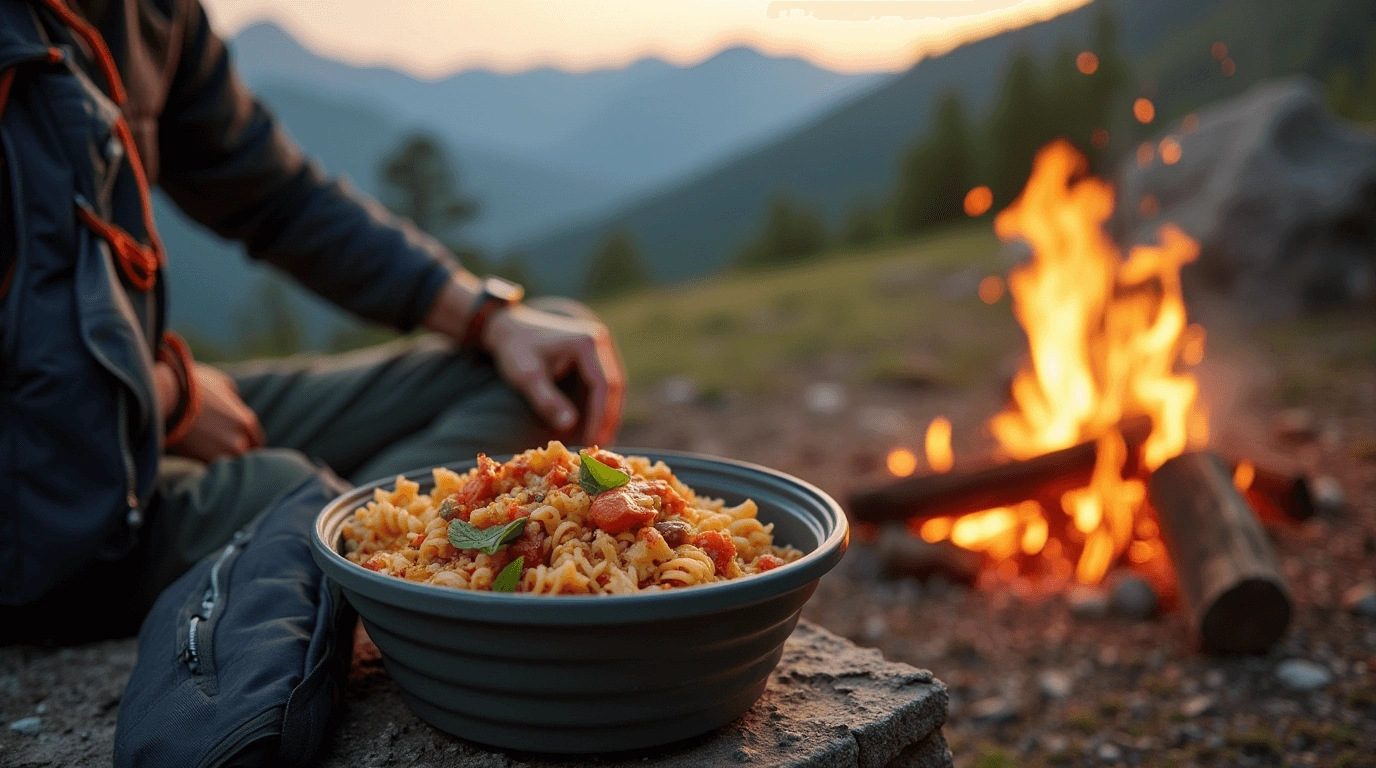
When you’re out on the trail, nothing beats the joy of a satisfying, home-cooked meal that’s easy to prepare and packed with energy. Backpacking recipes aren’t just about fueling your body; they’re about creating moments that make your adventure even more memorable. Whether you’re a seasoned hiker or planning your first outdoor trek, having lightweight, one-pot meals can transform your experience.(backpacking recipes)
Table of Contents
With just a few shelf-stable ingredients and some minimalist cooking gear, you can whip up dishes that are as delicious as they are practical. Ready to discover meals that are quick to prepare, loaded with flavor, and perfect for every trip? Let’s dive in and make your next outdoor adventure even tastier!(backpacking recipes)
Key Benefits (backpacking recipes)
When it comes to backpacking, your meals need to do more than just satisfy your hunger—they should energize you for the journey ahead, be easy to prepare, and take up minimal space in your pack. Here’s why this recipe stands out as a trail-friendly favorite:
- Lightweight and Portable: All the ingredients are compact and easy to carry, making this recipe ideal for backpacking trips.
- Quick Preparation: Designed for minimal effort, this meal can be ready in minutes using just a single pot or pan.
- High Nutritional Value: Packed with protein, healthy carbs, and essential fats to keep your energy levels steady during long hikes.
- Shelf-Stable Ingredients: No refrigeration required—perfect for multi-day trips where fresh food isn’t an option.
- Versatile and Customizable: You can adjust flavors or swap ingredients based on your preferences or dietary needs.(backpacking recipes)
With these benefits in mind, this recipe ensures your meals on the trail are as enjoyable as the journey itself! Ready to pack light and eat well? Let’s dive in!
Ingredients (backpacking recipes)
For this backpacking recipe, we’re keeping things simple yet nutritious with ingredients that are easy to pack, don’t require refrigeration, and will fuel your adventure. Here’s what you’ll need:
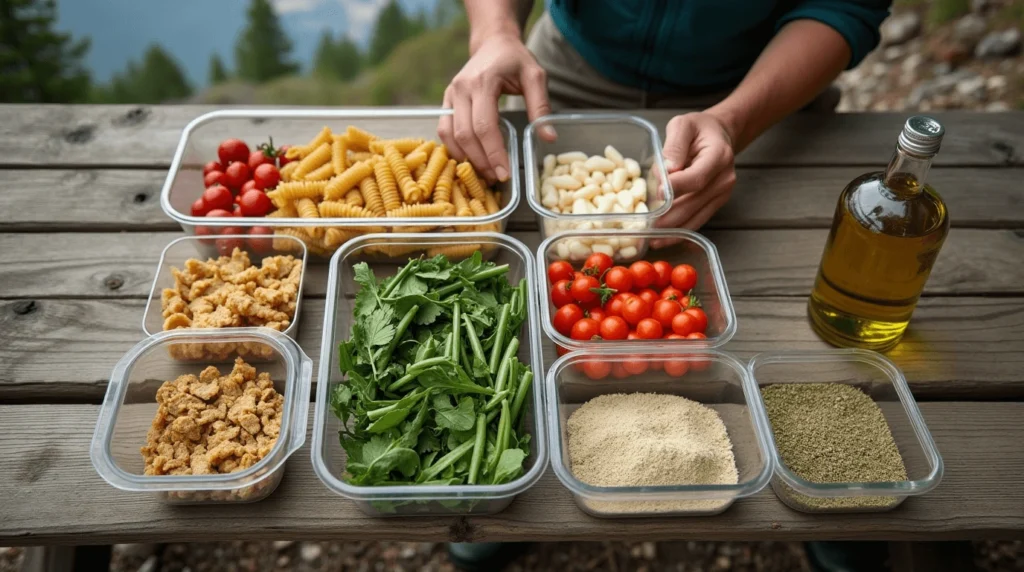
- 1 cup dried pasta (any type you prefer—small shapes work best for quick cooking)
- 1/2 cup freeze-dried vegetables (such as peas, carrots, and corn—these add vitamins and color to your meal)
- 1/2 cup dehydrated protein (like beans, lentils, or your choice of freeze-dried meat—packed with energy-boosting protein)
- 2 tbsp olive oil (to add healthy fats and help sauté your ingredients)
- 1/2 tsp garlic powder (for flavor—easy to pack and gives a punch of savory goodness)
- 1/2 tsp dried oregano (a classic spice that enhances the taste of your meal)
- Salt and pepper to taste
- 1 tbsp Parmesan cheese (optional, but adds a creamy finish and extra flavor)
Pro Tip: Feel free to swap in your favorite spices or seasonings. If you love spicy food, try adding chili flakes or smoked paprika. This recipe is incredibly versatile, so you can make it your own with whatever flavors excite you most!(backpacking recipes)
These ingredients are simple but full of energy, and they’ll stay fresh without refrigeration for days—perfect for your next outdoor adventure. Let’s get cooking!
Instructions (backpacking recipes)
Now that you’ve gathered your ingredients, it’s time to get cooking! This recipe is all about simplicity, so don’t worry—it’s a breeze to make, even after a long day of hiking. Follow these easy steps, and you’ll have a delicious, energy-packed meal in no time.(backpacking recipes)
- Boil Water: Start by bringing about 4 cups of water to a boil in your pot or small camp stove. This will be used to cook the pasta and rehydrate the veggies.
- Add Pasta: Once the water is boiling, add the dried pasta. Stir occasionally to prevent it from sticking, and cook for 8-10 minutes, or until it’s tender.
- Rehydrate Veggies and Protein: While the pasta is cooking, add the freeze-dried vegetables and dehydrated protein to the pot. You can stir these in with the pasta or add them toward the end of the cooking time, depending on how much texture you prefer.
- Season the Dish: After the pasta is cooked and everything is heated through, stir in the olive oil, garlic powder, oregano, salt, and pepper. Let it simmer for another 2-3 minutes to allow the flavors to blend.
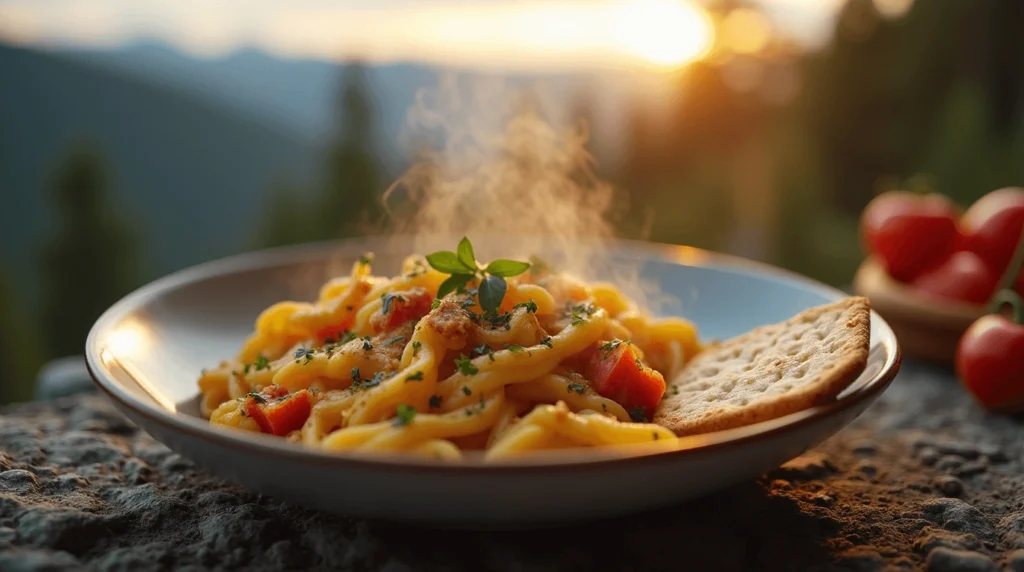
- Add Cheese (Optional): For a creamy touch, sprinkle in the Parmesan cheese and stir until it melts. This will give your meal that extra richness.
- Serve and Enjoy: Your backpacking meal is now ready! Serve it directly from the pot for a cozy, no-fuss dinner, or divide it into smaller portions for later meals.
Pro Tip: Don’t forget to taste test before serving! If you feel it needs more flavor, add a pinch of salt, extra garlic powder, or even a squeeze of lemon for brightness.(backpacking recipes)
That’s it! With minimal steps and a few simple ingredients, you’ve created a hearty and delicious meal that’s perfect for your next hiking adventure.
Pro Tips and Variations (backpacking recipes)
This recipe is as flexible as your backpacking journey! Here are some tips and variations to help you make the most of it, ensuring every meal is just the way you like it:
- Make It Spicy: Love a little heat? Add chili flakes or a drizzle of hot sauce to kick up the flavor. If you prefer a smoky spice, smoked paprika is a great addition.
- Switch Up the Protein: While beans or lentils are fantastic plant-based options, you can swap them out for freeze-dried chicken, beef, or even tofu if you’re looking for something different. Just make sure it’s shelf-stable for easy packing!
- Bulk Up the Veggies: If you’re craving even more greens, try adding extra dehydrated vegetables like spinach, kale, or bell peppers. These are lightweight and pack a punch of nutrients.(backpacking recipes)
- Low-Carb Option: If you’re cutting carbs or just want a lighter meal, replace the pasta with spiralized zucchini or low-carb noodles made from chickpeas or lentils.
- Flavor Boosters: Bring along a small packet of your favorite spice mix (like Italian seasoning or curry powder). Just a pinch can completely change the flavor profile of your meal!
- One-Pot Wonder: The beauty of this recipe is that it’s a one-pot meal, meaning less cleanup. If you want to minimize the load in your pack even further, use a collapsible bowl for eating and skip the extra utensils.
Pro Tip: Pack your ingredients in separate small zip-lock bags or vacuum-sealed pouches. This helps with organization and keeps everything fresh without taking up too much space.(backpacking recipes)
By personalizing your meal with these variations, you’ll always have a new take on this classic backpacking recipe, making every hike even more enjoyable!
Serving Suggestions (backpacking recipes)
Once your backpacking meal is ready, it’s time to enjoy it! While the recipe is delicious on its own, there are a few simple ways to elevate the experience and tailor it to your taste:(backpacking recipes)
- Serve with Crackers or Bread: If you have the space in your pack, bring along some crackers or a small loaf of bread. It’s a great way to add texture and make the meal feel more like a cozy dinner.
- Top with Fresh Herbs: If you’re near a campsite with fresh herbs (or packed a small container), sprinkle some basil, thyme, or parsley over the top. Fresh herbs add a burst of flavor and make your meal feel gourmet!
- Add a Side of Fruit: For a complete meal, pack along some easy-to-carry fruit like apples, oranges, or dried fruit. These are refreshing and give a natural sweetness that complements the savory flavors of your dish.
- Pair with a Hot Drink: A hot drink like herbal tea or instant coffee can be the perfect pairing after a satisfying meal. It’s the ideal way to unwind and warm up during a cool evening in the wild.(backpacking recipes)
Pro Tip: When serving your meal, consider using a collapsible bowl and spork to save space in your backpack and make eating in the great outdoors a breeze.(backpacking recipes)
With these simple serving suggestions, you’ll make each meal feel even more rewarding, turning your backpacking recipe into a delightful experience that nourishes both your body and spirit!
Conclusion (backpacking recipes)
Congratulations! You’ve just created a flavorful, energy-packed backpacking meal that will fuel your next outdoor adventure. This recipe is designed to be easy, lightweight, and highly customizable, ensuring you can enjoy a satisfying dish no matter where your hiking journey takes you.(backpacking recipes)
With the right ingredients, a few simple steps, and a touch of creativity, you can turn any trail into a gourmet experience. Whether you’re camping for the weekend or tackling a multi-day hike, this one-pot meal will save you time and effort, leaving you more moments to savor the great outdoors.
Pro Tip: If you’re planning to make this recipe for multiple trips, batch your ingredients in individual portions and store them in resealable bags. This will save you even more time and keep your meals organized for future adventures.
So, next time you hit the trails, pack this easy-to-make recipe and enjoy a delicious, homemade meal that makes every moment on the path that much better!
FAQs (backpacking recipes)
Here are some frequently asked questions that might help you get the most out of this backpacking recipe:
1. Can I prep this meal in advance?
Absolutely! In fact, prepping your ingredients ahead of time is a great way to make your hike even more enjoyable. You can pre-assemble the dry ingredients in resealable bags or vacuum-sealed pouches, so all you have to do is add water when you’re ready to cook.
2. Can I use fresh vegetables instead of freeze-dried?
While fresh vegetables are tasty, they’re not as backpacker-friendly since they require refrigeration and won’t stay fresh for multiple days. For a similar texture and nutrition, freeze-dried veggies are your best bet—they’re lightweight, shelf-stable, and don’t take up much space.
3. How can I store leftovers?
If you end up with leftovers, simply allow the meal to cool, then store it in an airtight container or a resealable bag. If you’re camping, be sure to keep it in a bear-safe storage container if necessary. For longer trips, you may want to pack dehydrated meals to reduce the risk of spoilage.
4. Can I adjust the serving size?
Definitely! This recipe is easily scalable. Simply adjust the ingredients based on how many servings you need. Just remember to increase the water and cooking time accordingly, especially if you’re cooking for a larger group.
5. What’s the best way to clean up?
To make cleanup a breeze, use a small sponge or biodegradable wipes to wipe out your pot. If you’re using a non-stick pot, it’s even easier! Just be sure to follow Leave No Trace principles and dispose of any food waste properly.
These tips should help you get the most out of this recipe and ensure your outdoor meals are as enjoyable as the adventure itself!
backpacking recipes
This backpacking pasta recipe is the perfect blend of simplicity, nutrition, and flavor for your outdoor adventures. Whether you're on a short day hike or a multi-day journey, this meal is packed with energy and easy to prepare, leaving you more time to enjoy the great outdoors!
- Backpacking stove or portable camp stove
- Pot or small cooking pan
- Collapsible bowl and spork (for easy serving and cleanup)
1 cup dried pasta
1/2 cup freeze-dried vegetables (peas, carrots, corn)
1/2 cup dehydrated protein (beans, lentils, or freeze-dried meat)
2 tbsp olive oil
1/2 tsp garlic powder
1/2 tsp dried oregano
Salt and pepper, to taste
1 tbsp Parmesan cheese (optional)
Boil Water: Bring 4 cups of water to a boil in your pot or camp stove.
Add Pasta: Stir in dried pasta and cook for 8-10 minutes until tender.
Rehydrate Vegetables and Protein: Add freeze-dried veggies and protein to the pot, simmer for 2-3 minutes.
Season: Stir in olive oil, garlic powder, oregano, salt, and pepper. Let it cook for another 2-3 minutes.
Add Cheese (Optional): Sprinkle in Parmesan cheese for extra flavor. Stir until melted.
Serve and Enjoy: Serve hot directly from the pot or store for later use.
- Make-Ahead Option: Pre-pack the ingredients in resealable bags for easier preparation while hiking.
- Flavor Variations: Adjust the spices, protein, and veggies based on your preferences. Add chili flakes or hot sauce for extra heat!
- Storage: Store leftovers in an airtight container or resealable bag for future meals.