
Are you looking for a quick and delicious way to start your day? Breakfast crescent rolls are not only easy to make, but they also offer endless possibilities for customization. Whether you prefer savory fillings like cheese and breakfast meats or sweet options with fruits and spices, these rolls can cater to your taste. Moreover, they are perfect for busy mornings, allowing you to enjoy a nutritious start without spending hours in the kitchen. In this guide, you will discover how to create mouthwatering breakfast crescent rolls that will impress your family and friends. So, let’s dive into the world of quick breakfast ideas and explore how you can make your mornings more delightful!
Table of Contents
Key Benefits of Breakfast Crescent Rolls
Breakfast crescent rolls are not just a delicious treat; they also offer a variety of benefits that make them a fantastic choice for your morning routine. Here’s why you should consider adding them to your breakfast lineup:
- Quick and Easy: Breakfast crescent rolls are a time-saving option. With just a few ingredients, you can whip up a satisfying meal in no time. This is especially helpful on busy mornings when you need to get out the door quickly.
- Versatile Fillings: One of the best things about breakfast crescent rolls is their flexibility. You can fill them with anything from scrambled eggs and cheese and spinach. This means you can easily cater to different tastes and dietary preferences.
- Nutritious Start: By choosing wholesome fillings, you can create a nutritious breakfast that fuels your day. For instance, adding vegetables and lean proteins can enhance the nutritional value of your breakfast crescent rolls.
- According to the USDA’s dietary guidelines, incorporating vegetables, whole grains, and lean proteins into your breakfast can contribute to improved overall health and energy levels throughout the day:
- Perfect for Meal Prep: If you’re looking to streamline your mornings, breakfast crescent rolls are ideal for meal prep. You can make a batch ahead of time, store them, and simply reheat when you’re ready to eat.
- Fun for the Family: Kids love them! Involving your family in the preparation can turn breakfast into a fun activity. Plus, they can customize their rolls with their favorite ingredients.
In summary, breakfast crescent rolls are a delightful and practical choice for anyone looking to enjoy a quick, nutritious, and customizable breakfast. So, why not give them a try? You might just find your new favorite morning meal!
Ingredients for Breakfast Crescent Rolls
Creating delicious breakfast crescent rolls starts with selecting the right ingredients. Here’s a handy list to guide you:
- Crescent Roll Dough: This is the star of the show! You can use store-bought dough for convenience or make your own if you’re feeling adventurous.
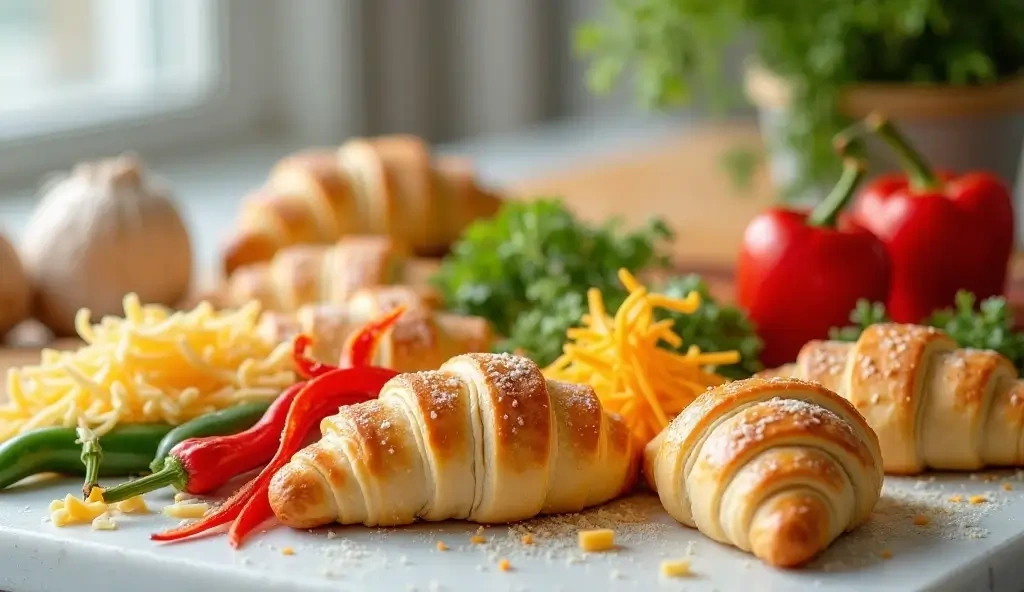
- Fillings: The beauty of breakfast crescent rolls lies in their versatility. Consider using a mix of breakfast meats, sausage. Additionally, cheeses such as cheddar, cream cheese, or mozzarella can elevate the flavor. For a healthier twist, choose meats lower in sodium and saturated fat, as recommended by the Centers for Disease Control and Prevention (CDC)
- Vegetables: Don’t forget to add some veggies! Spinach, bell peppers, or mushrooms not only add nutrition but also a burst of color.
- Spices: A sprinkle of garlic powder, onion powder, or Italian seasoning can enhance the overall taste. Feel free to experiment!
- Fresh Herbs: Chopped parsley or chives can add a fresh touch, making your breakfast crescent rolls even more delightful.
When selecting your ingredients, opt for fresh produce and high-quality meats for the best flavor. If you’re looking for substitutions, consider using plant-based meats or dairy-free cheese to cater to dietary preferences. Furthermore, you can mix and match fillings based on what you have on hand. This flexibility makes breakfast crescent rolls a fantastic option for quick breakfast ideas!
How to Make Breakfast Crescent Rolls
Making breakfast crescent rolls is not only simple but also incredibly rewarding. Follow these easy steps to create a delicious and customizable breakfast that your family will love!
- Preheat Your Oven: Start by preheating your oven to 375°F (190°C). This ensures that your breakfast crescent rolls bake evenly and achieve that golden-brown perfection.
- Prepare the Dough: Open a can of crescent roll dough. Gently unroll it on a clean surface. Be careful not to tear the dough, as it needs to hold your delicious fillings.
- Choose Your Fillings: Now comes the fun part! Select your favorite fillings. You can use breakfast meats like cooked sausage, cheeses such as cheddar or cream cheese, and even vegetables like spinach or bell peppers. For a sweet twist, consider adding fruit preserves or chocolate chips. If you’re choosing fruit preserves, opt for low-sugar or natural fruit spreads to help reduce added sugar intake, a key recommendation by the American Heart Association
- Assemble the Rolls: Take a triangle of dough and place a small amount of your chosen filling at the wide end. Then, roll the dough towards the point, tucking in the sides as you go. This helps keep the filling secure. Repeat this step for each triangle until all your dough is used.
- Arrange on a Baking Sheet: Place the rolled crescent rolls on a baking sheet lined with parchment paper. Make sure to leave some space between each roll to allow for expansion during baking.
- Brush with Egg Wash: For a beautiful finish, whisk an egg and brush it over the tops of the rolls. This step adds a lovely shine and enhances the golden color.
- Bake to Perfection: Pop the baking sheet into your preheated oven. Bake for about 12-15 minutes or until the rolls are golden brown. Keep an eye on them, as oven times may vary.
- Cool and Serve: Once baked, remove the rolls from the oven and let them cool for a few minutes. Serve warm, and enjoy your delightful breakfast crescent rolls!
As you make these breakfast crescent rolls, remember to have fun with the process. Experiment with different fillings and flavors to find your perfect combination. Enjoy your delicious creation!
Pro Tips, Variations, and Common Problems for Breakfast Crescent Rolls
Making breakfast crescent rolls can be a delightful experience, but it’s not uncommon to run into a few bumps along the way. Here are some pro tips and variations to help you create the perfect breakfast crescent rolls every time!
Pro Tips
– **Use fresh dough**: Always check the expiration date on your crescent roll dough. Fresh dough rolls out better and yields a flakier texture.
– **Preheat your oven**: This is crucial! Preheating ensures even baking. Aim for 375°F (190°C) for golden, crispy rolls.
– **Don’t overfill**: While it’s tempting to pack in the fillings, overstuffing can lead to messy rolls. A tablespoon or two of filling is usually just right.
– **Seal the edges**: To prevent your fillings from leaking out, pinch the edges of the dough tightly before baking. This step is essential for a neat presentation.
– **Brush with egg wash**: For a beautiful golden finish, brush the tops with a mixture of beaten egg and a splash of water before baking.
Creative Variations
– **Savory options**: Try adding cooked sausage, scrambled eggs, and shredded cheese for a hearty breakfast. Alternatively, mix in sautéed spinach and feta for a Mediterranean twist.
– **Sweet treats**: For a sweeter version, fill your crescent rolls with cream cheese and fruit preserves. You can also sprinkle cinnamon sugar on top before baking for an extra touch.

– **Vegetarian delights**: Use roasted vegetables and goat cheese for a delicious vegetarian option. For additional plant-based breakfast inspiration, Harvard’s T.H. Chan School of Public Health offers a guide on healthy vegetarian eating.
Common Problems and Solutions
– **Texture issues**: If your rolls turn out dense, it may be due to overworking the dough. Remember, handle it gently and avoid excessive kneading.
– **Burnt bottoms**: If you notice the bottoms are browning too quickly, place a baking sheet underneath your crescent rolls. This will help distribute heat more evenly.
– **Underbaked centers**: If the outside looks done but the inside is still doughy, try lowering the oven temperature slightly and extending the baking time. This approach allows for thorough cooking without burning the exterior.
– **Flavor problems**: If your breakfast crescent rolls taste bland, don’t hesitate to season your fillings! A pinch of salt, pepper, or your favorite herbs can elevate the flavor significantly.
By following these tips and exploring variations, you’ll be well on your way to mastering breakfast crescent rolls. Enjoy the process, and don’t be afraid to get creative!
Serving Suggestions for Breakfast Crescent Rolls
When it comes to serving breakfast crescent rolls, the possibilities are as delightful as the rolls themselves! Whether you’re hosting a casual brunch or a cozy family breakfast, these crescent rolls can shine in various settings. Here are some engaging ideas to elevate your breakfast experience.
Plating Ideas
To make your breakfast crescent rolls visually appealing, consider the following plating tips:
- Arrange the rolls on a large, colorful platter. This not only showcases their golden-brown hue but also invites everyone to dig in.
- For a touch of elegance, serve the rolls in individual ramekins or small baskets lined with parchment paper. This adds a charming, rustic feel.
- Garnish with fresh herbs, such as parsley or chives, to add a pop of color and freshness. A sprinkle of powdered sugar can also enhance sweet variations.
Side Dish Pairings
To complement your breakfast crescent rolls, consider these delicious side dishes:
- Fresh fruit salad adds a refreshing contrast. Think berries, melons, and citrus for a vibrant mix.
- Scrambled eggs or an egg casserole can provide a hearty addition, making your breakfast both filling and nutritious.
- Pair with crispy or sausage links for a savory touch that balances the sweetness of the rolls.
Creative Serving Options
Depending on the occasion, you can serve breakfast crescent rolls in various styles:
- For a casual setting, place the rolls in a basket with a side of jam or honey for dipping. This encourages a relaxed, communal atmosphere.
- For a more elegant affair, consider a tiered serving stand. Layer the crescent rolls with other brunch items like mini quiches or pastries for a stunning display.
- Family-style serving is another great option. Simply place the rolls on the table along with bowls of toppings, such as cream cheese, avocado, or smoked salmon, allowing everyone to customize their own rolls.
Ultimately, serving crescent roll breakfast casserole can be as simple or as sophisticated as you desire. By incorporating these plating ideas, side dish pairings, and creative serving options, you’ll create a memorable breakfast experience that your family and friends will love. So, gather around the table and enjoy the delightful flavors of your breakfast crescent rolls together!
Preserving and Reheating Breakfast Crescent Rolls
Breakfast crescent rolls are not only delicious but also incredibly versatile. However, to enjoy them at their best, proper storage and reheating techniques are essential. Let’s dive into how to keep your breakfast crescent rolls fresh and tasty!
Storage Tips
To keep your breakfast crescent rolls fresh, store them in an airtight container or a resealable plastic bag. If you plan to eat them within a few days, refrigeration is a good option. They will stay fresh in the fridge for about 3 to 5 days. For longer storage, consider freezing them. Wrapped tightly in plastic wrap and then placed in a freezer-safe bag, breakfast crescent rolls can last up to 2 months in the freezer. This method prevents freezer burn and keeps them tasting great. For best practices on freezing and food storage safety, refer to this guide from FoodSafety.gov.
Additionally, always label your containers with the date to keep track of freshness. When storing, ensure that the rolls have cooled completely to room temperature to avoid condensation, which can lead to spoilage. Remember, food safety is crucial; always check for any signs of mold or off smells before consuming.
Reheating Methods
When it comes to reheating breakfast crescent rolls, you want to preserve their flaky texture and delicious flavor. The oven is the best method for this. Preheat your oven to 350°F (175°C). Place the rolls on a baking sheet and cover them loosely with aluminum foil to prevent them from drying out. Heat for about 10 to 15 minutes, or until warmed through. This method ensures they regain their crispiness.
If you’re short on time, the microwave is an option, but it requires a bit of care. Place a damp paper towel over the rolls to add moisture, then heat them in 15-second intervals until warm. However, be cautious, as microwaving can make them chewy if overdone.
For a quick and crispy option, the air fryer works wonders. Set it to 300°F (150°C) and heat the rolls for about 5 minutes. This method revives their crunch while keeping the insides warm. Lastly, if you prefer a stovetop method, you can reheat them in a skillet over low heat, covering with a lid to trap steam and heat evenly.
In summary, whether you choose to refrigerate or freeze your breakfast crescent rolls, following these storage and reheating tips will ensure they remain a delightful treat. Enjoy your breakfast crescent rolls just as they were meant to be—flaky, warm, and utterly delicious!
Conclusion
In summary, making breakfast crescent rolls is a delightful and straightforward process that anyone can master. By simply rolling out crescent dough and filling it with your favorite ingredients—whether that’s savory breakfast meats, creamy cheeses, or vibrant vegetables—you can create a delicious meal in no time. This recipe not only offers a quick breakfast idea but also allows for endless customization, making it a fantastic choice for busy mornings or leisurely brunches. So, I encourage you to gather your ingredients and give it a try; you might just discover a new family favorite!
Share Your Creations
Once you’ve made your breakfast crescent rolls, I’d love to hear about your experience! Feel free to share your results or ask any questions you may have. Additionally, don’t hesitate to experiment with different fillings or pairings to make this recipe your own. Cooking is all about creativity and fun, and crescent roll breakfast are a perfect canvas for your culinary imagination. Enjoy the process, and happy baking!
Frequently Asked Questions about Breakfast Crescent Rolls
Welcome to our FAQ section! Here, we address some common questions about breakfast crescent rolls to help you make the most of this delightful recipe.
1. Can I use homemade dough instead of store-bought crescent roll dough?
Absolutely! While store-bought dough is convenient, homemade dough can add a personal touch. Just ensure it’s rolled out thinly for the best results. Additionally, you can customize the flavor of your dough by adding herbs or spices.
2. What are some popular fillings for breakfast crescent rolls?
There are countless options! You can use breakfast meats or sausage, cheeses such as cheddar or cream cheese, and even vegetables like spinach or bell peppers. For a sweet twist, try adding fruit preserves or chocolate chips. The possibilities are endless!
3. How do I prevent my crescent rolls from becoming soggy?
To avoid sogginess, make sure to drain any wet ingredients, like cooked vegetables, before adding them to your rolls. Furthermore, avoid overfilling them, as this can lead to leaks during baking. Lastly, baking them until golden brown will help achieve a crispy texture.
4. Can I make breakfast crescent rolls ahead of time?
Yes, you can! Prepare the rolls and assemble them, then cover and refrigerate them overnight. In the morning, simply bake them straight from the fridge. This way, you’ll have a quick breakfast ready to go!
5. How should I store leftover breakfast crescent rolls?
Store any leftovers in an airtight container at room temperature for up to two days. If you want to keep them longer, consider freezing them. Just wrap each roll tightly in plastic wrap and place them in a freezer bag. When you’re ready to enjoy, reheat them in the oven for the best texture.